Bonnet removal
- remove inner wheel arches from bonnet
- disconnect all electical connectors to front headlights, sidelights and indicators
- disconnect cold air ducting from air intakes on bonnet
- support the front of bonnet on some wooden blocks (not required if two people slide bonnet off hinge arrangement having removed the two locking nuts)
- remove the hinge bolts on either side of the bonnet (see above varation)
- Lift away the bonnet
Engine bay
- drain radiator and disconnect top and bottom hoses
- remove radiator and fan unit
- disconnect all wiring (label everything) - I coiled up and put in bag next to bulkhead to save damage
- disconnect pipes to brake master cylinder and clutch master cylinder and cover to ensure debris remains out of pipes.
- disconnect heater hoses
- Disconnect throttle cable
Chassis fixing bolts
- Jack up car and secure firmly
- remove exhaust
- remove seats - Replace the securing bolts and nuts with stainless steel bolts with an Allen key head for ease of future removal
- remove carpets - I just peeled back in area of securing bolts
- remove seat belts & anchor points (3 off each side)
- remove other fixing, 4 off in front footwells, 2 off middle mounts either side of tunnel, 2 off below seat belt unit, 2 off in boot. 2 off bolts under centre console (by radio).
- remove handbrake lever and disconnect cble
- disconnect speedo and reversing light electrics from gearbox
Petrol tank
- some people remove tank I opted to leave it in until after lift and then remove. If leaving in make sure you disconnect sender unit electrics and remove boot strut lower bolt (it catches on outside of tank during lift if not removed).
- clear away sealant around petrol tank neck and bodywork in the boot
- remove filler pipe at both top and bottom flexibles.
- disconnect electrics from fuel pump
- Remove boot gas strut lower securing bolt (it catches on the petrol tank (if left in) during the body lift.
- Some cars have an earth strap at the rear of the car in the passenger rear wheelarch just in front of the petrol tank - mine didn't so what its for I haven't a clue but there is a phot supplied by another owner just incase yours does
Gear Lever
- remove 2 off self tappers from each side rear of centre console and lift rear
- remove gear lever rubber gaiter
- I removed central console to gain access to 2 bolts under the central control panel.
Steering removal
- Undo top universal joint on steering colum
- Loosen steering rack securing bolts to give enough movement (other option is to loosen off steering column and pull from inside car) .
- Pull steering rack forward until UJ splits apart.
Final checks
- double check everything is disconnected
Photos
- The disconnection photos are HERE
The following are additional bits found by another owner (trick John from Pistonheads) during his body lift of an S3C, so may be applicable to your lift or may not - don't forget they are all different in some way!!!!
1) There was an earth coming from under the boot - which was attached to a stud at the beam in front of the fuel tank - on the same side as the fuel tank connections. I noticed it when undoing the fuel sender.
2) The nasty bolts to find under the eye ball vents in the centre consul - had air inlet tube glued into the body - this had to be removed as I could not undo the bolt as the upward movement started heavy interference between the bolt and tube.
3) Cat tubes going through the boot - needed to be disconnected and pulled through the boot.
The file below is the under bonnet physical schematic for a V8S provided by Chris Bark:
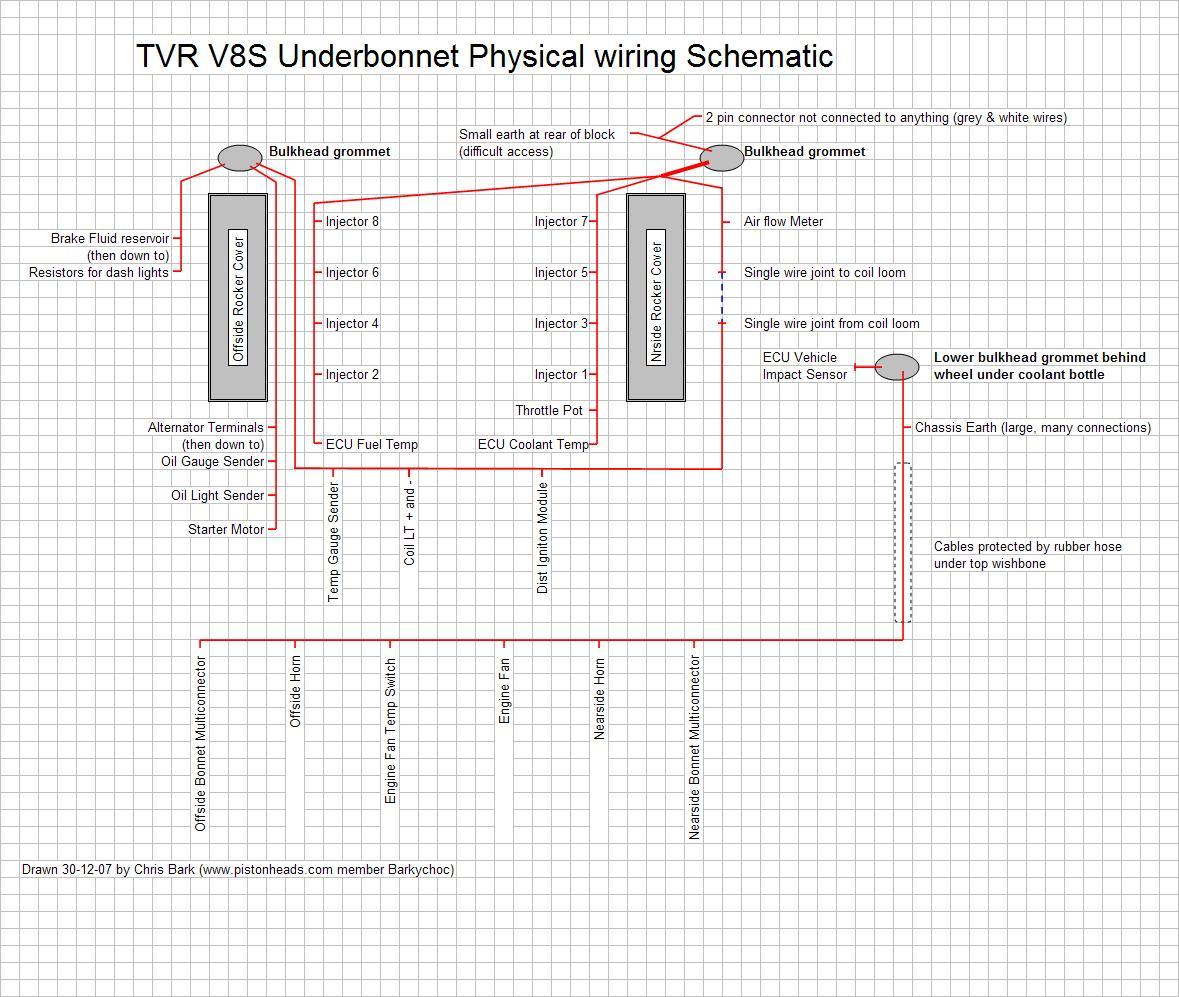
TVR V8S Under bonnet wiring loom schematic v1-01 |